Friday, October 31, 2014
Boo... Trick or Treat!
By Jeanette Andrade MS,RDN,LDN
Halloween is finally here and my kids are ecstatic. They have been
anticipating this day for months. Seriously as soon as one of the Halloween
stores opened up we were there at once pressing and playing with all the
ghoulish motorized objects and of course looking for that ideal costume. FYI we
settled on a princess and batman for the costumes. I asked my oldest child why
she loves Halloween so much and she said, “We get to dress up and we get scared
by people yelling boo.” I had to chuckle as my sweet daughter comes from a
dietitian’s household so there was no mention of getting lots of candy nor of
eating it. However, we will still venture outside for a couple of blocks with
their pumpkins held tightly and knock on the various doors saying, “Trick or
Treat”. In which they will receive their
ultimate prize- candy. After we return from our trick or treating adventure, we
will go through the candy and keep a small amount of the candy. So what do we
do with the rest? We donate it to our local dentist. For every pound of candy
our kids bring in they get a $1.00. I mean I would rather trade in my candy for
a $1.00 any day. The dentist then sends the candy off to our troops. If,
though, no one around your area accepts Halloween candy, there are a few other
ideas to do with all the candy your kids bring back. A few ideas are to freeze
it to make homemade ice cream or frozen yogurt, making homemade adult
beverages, or my favorite turn it into a science project for your kids! One may
ask, how can you turn candy you bring home into a science project? Well, you
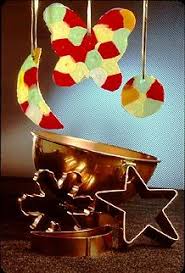
can make certain candies into decorations. For instance, with the use of
crushed lifesavers, you can melt them and create stained glass shapes to hang
on your windows.
This idea comes from Crandell (2014). Her recipe calls for:
Heavy metal cookie cutters (large copper cutters and they work great)
Vegetable spray
Life Saver or other hard candies
Aluminum foil
Cookie sheet
Straw
Narrow shiny ribbon
Preheat oven to 350°. Line your cookie sheet with aluminum foil and spray the cookie cutters and aluminum foil with vegetable cooking spray. Fill the inside of the cookie cutters with a single layer of candy using as many as will fit. Bake 5 to 7 minutes until candies are melted.
Remove from oven and allow candy to cool about 2 minutes. Make a hole in each with a straw to thread ribbon through for hanging then continue cooling until the cutters can be handled. Very gently pull cutters away from the melted candy.
For more ideas about what to do with leftover candy, you can visit: http://www.parenting.com/gallery/things-to-do-with-leftover-halloween-candy?page=0
.
Whatever you may be doing for Halloween, have a safe and fun time…..Boo!
Crandell, K. (2014). Top Ten
Scientific Uses for Leftover Halloween Candy. Retrieved from http://www.science20.com/science_motherhood/top_10_scientific_uses_leftover_halloween_candy
Subscribe to:
Post Comments (Atom)
0 comments:
Post a Comment